Skip to content
    Warranty Tracker Thumbnail

    Why Warranty Tracking Matters

    Unresolved warranty issues can damage your reputation and cause costly delays. With TaskTag’s warranty tracking system, you can document, assign, and resolve warranty claims directly inside your project workspace—no extra tools needed.

    Who this is for: Builders, contractors, project managers, field supervisors, or warranty coordinators managing post-construction service and warranty claims.

    What this solves: Warranty requests are more than just service calls — they’re a legal and reputational risk. Poorly documented or mismanaged warranty claims can lead to client disputes, contract breaches, or even legal action. TaskTag offers a way to organize, document, and respond to warranty issues clearly and efficiently — minimizing liability and protecting your team.

    Common Challenges in Construction Warranty Management

    Warranty issues don’t just test your craftsmanship — they test your process.

    Even on well-executed jobs, clients may call weeks or months later about:

    • A leak during a storm
    • Cracks in drywall
    • Doors or windows warping
    • HVAC or plumbing performance
    • Cosmetic flaws that weren’t caught earlier

    The real problem isn’t just the issue itself — it’s the risk that comes with how it’s handled:

    • Warranty requests come in by text, email, or phone and get lost
    • No one assigns or owns the issue
    • There’s no paper trail of what the client said or what was done
    • Clients get frustrated, feel ignored, and escalate
    • You expose your company to reputation damage, chargebacks, or even legal disputes

    How to Streamline Warranty Tracking with TaskTag

    With TaskTag, you can:

    • Use the existing project and chat group to keep all warranty communication centralized
    • Create a dedicated task for each warranty issue
    • Include photos, description, assignment, and schedule
    • Share the task with the client as a viewer — so they’re informed but not overwhelmed
    • Keep all updates, comments, and signatures timestamped and organized
    • Resolve the issue professionally — with full documentation for your records

    Step 1: Use the Project Chat to Manage Client Warranty Requests

    Step 1 - Use the Project Chat to Manage Client Warranty Requests

    If you already created a project and chat group during the build (e.g. 'Smith Residence'), continue using it to handle warranty requests.

    This keeps all project-related communication — including warranty work — in one searchable channel.

    If you haven't already, make sure to create a project and connect with your client and team on TaskTag to help keep things organized!

    Step 2: Create a Task for Every New Warranty Issue

    Step 2 - Create a Task for Every New Warranty Issue

    Each issue should be tracked individually. Name the task clearly:

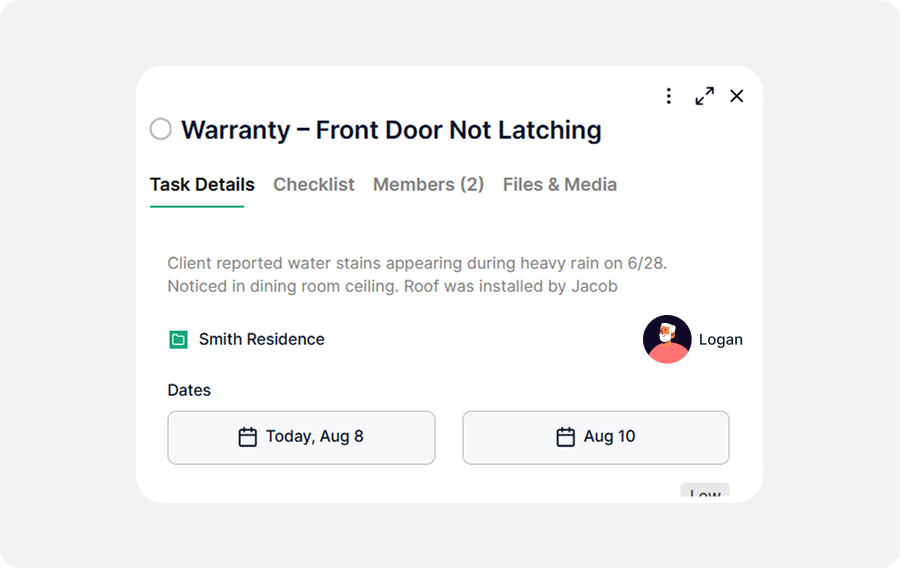
    • Warranty - Front Door Not Latching
    • Warranty - Water Stains in Living Room
    • Warranty - AC Not Cooling Bedroom

    This creates a clear record of what was reported, when, and how it was resolved

    Step 3: Document the Warranty Problem with Notes and Tags

    Step 3 - Document the Warranty Problem with Notes and Tags

    Use the task description to include:

    • The client’s original message or complaint
    • When it was reported
    • Who it was reported to
    • Any instructions or site access notes
    • Any related warranty limitations (if applicable)

    For example:

    “Client reported water stains appearing during heavy rain on 6/28. Noticed in dining room ceiling. Roof was installed by [Subcontractor Name].”

    Step 4: Assign the Warranty Repair Task to Your Team or Subcontractor

    Step 4 - Assign the Warranty Repair Task to Your Team or Subcontractor

    Assign to:

    • Your internal field supervisor or warranty manager
    • The relevant subcontractor or vendor (e.g. roofer, plumber)

    This ensures responsibility is clear and the issue doesn’t fall through the cracks.

    You will need to connect with them to assign them to the task ahead of time, though.

    Step 5: Schedule Warranty Work with Due Dates and Notifications

    Step 5 - Schedule Warranty Work with Due Dates and Notifications
    • Start Date = Date the issue was reported
    • Due Date = Target resolution date (based on urgency or contractual response time)

    Step 6: Add Photos, Videos, and Progress Updates in Real Time

    Step 6 - Add Photos, Videos, and Progress Updates in Real Time

    Photos provide visual proof of:

    • The issue (before repair)
    • The completed fix (after repair)
    • Any access issues or site conditions
    • Signed repair tickets or service receipts

    Make sure to tag all updates in the chat using the project hashtag (e.g. #Smith_Residence) so they’re automatically attached to the task!

    Step 7: Share Warranty Status with the Client via TaskTag

    Step 7 - Share Warranty Status with the Client via TaskTag

    You can share the task with the client as a viewer (free), so they can:

    • See progress and updates
    • Add comments or approvals
    • Feel confident the issue is being addressed professionally

    Ideally you should already be connected with the client, so sharing the task should be easy; if not, follow this guide to connect with them easily.

    Example: Tracking and Resolving a Leaking Window Warranty Claim

    Project: Smith Residence

    Task: Warranty - Upstairs Bedroom Window Leak

    Field Example
    Description “Client reported leak after storm on 6/28. Window installed by ABC Windows. Needs inspection.”
    Photos Uploaded by client and field tech
    Assigned Field Super + ABC Windows
    Dates Start: 6/28, Due: 7/2
    Comments “Sub going out on Thursday. Caulking replaced.”
    Status Task marked complete with photo of sealed window

    Best Practices for Managing Construction Warranty Claims in TaskTag

    One task per issue

    Keeps the timeline and resolution clear

    Always capture before + after photos

    Protects against disputes and shows proof of work

    Document everything in the task

    Don’t rely on memory or texts

    Use hashtags in chat messages

    Automatically links updates to the project record

    Use proper roles and assignees

    Make sure the responsible party is clearly assigned

    Stick to due dates

    Helps avoid escalation and shows responsiveness


    Completion Checklist for Closed Warranty Tasks

    • [ ] Warranty issue tracked as a task in the original project
    • [ ] Detailed description and photos added
    • [ ] Assigned to appropriate team or subcontractor
    • [ ] Start and due dates set
    • [ ] Updates and resolution documented in photos and chat
    • [ ] Client shared on task as viewer
    • [ ] Task marked complete with timestamp and closure note

    Why Warranty Tracking in TaskTag Improves Customer Satisfaction and Jobsite Efficiency

    Reduces liability — You’ve got a clear, timestamped record of what was claimed and what was done

    Protects your team — From exaggerated claims, miscommunication, or legal threats

    Improves client trust — Clients see you’re responsive, transparent, and professional

    Saves time — No digging through texts or inboxes to find what was said

    Strengthens your brand — You don’t just build great projects — you back them up

    “A well-documented warranty process isn’t optional — it’s protection. For your team, your reputation, and your bottom line.”

    Frequently Asked Questions (FAQs)

    1. How do I make sure clients can view warranty updates in TaskTag?
    You can share individual warranty tasks or the full project view with clients by using the built-in sharing options. This keeps them in the loop with real-time updates, photos, and due dates—no extra emails needed.

    2. Can I track who’s responsible for each warranty task?
    Yes. Assign each warranty request to a specific team member or subcontractor directly within the task. You’ll be able to monitor progress, check completion, and review accountability all in one place.

    3. What happens when a warranty item is resolved?
    Once resolved, simply mark the task as "Done." The full task history, including photos, checklists, and notes, is stored in the activity log—perfect for future reference or client handoffs.

    Next Guide: Selection Tracker Workflow

    Free Plan

    Free

    No cost, no commitment
    • Send unlimited messages on web and mobile
    • Manage projects and tasks with core features
    • Create and track up to 3 active projects
    • 2GB limit for photos, videos and files

    TaskTag Teams

    $16/month

    Enjoy Unlimited contributors
    • Track all activity across your team with the Global Activity Log
    • Organize your crews with Contact Groups
    • Get unlimited Project creation and personalized white-glove onboarding